What’s New in v2.33
This version add the support of Maya 2019 and extends the documentation with some more installation and licensing informaitons.
What’s New in v2.3 - v2.32
This version of HardMesh introduces a new licensing system and installer thanks to the partnership with SOuP-dev, the amazing procedural framework developed by Peter Shipkov.
In this version we also introduce the support for a Chinese UI thanks our partners www.aboutcg.org, a great resource for plugins and tutorials (in Chinese).
The v2.32 is the cross platform release of the version 2.3.
New features are in development and the intent of this release is to make the tool easier to access from the indipendent freelancer to the big studio.
Types of Licenses
Alongside with our internal licensing, we now have integrated the RLM licensing: http://www.reprisesoftware.com/
The licensing options are divided mainly in:
- Trial Licensing, using PUX licensing
- Permanent Licensing, using PUX licensing
- Subscription Licensing, using RLM
Please refer to the updated page Installation and Licensing for more information.
What’s New in v2.2
Version 2.2 of Hard Mesh fixes and enhance some features of the version 2.1.
The Hard Mesh objects generated with versions prior to the 2.1 can be opened, but will not react to the workflow window.
This is due to an improved node layout that adds new features, but is not compatible with the preview structure.
A conversion script for updating the networks is possible, but not currently planned.
Operator Bypass - one of the new features.
 |
|---|
| Turning on and off the operators opens up a layer style workflow. |
Workflow :
- Maya 2017 dockable window
- New operators Stack: now displayed as a list with icons.
- Reorder operators: move up and down the operators to change result and organize them.
- Delete any operator in the chain. Feel free to experiment even more
without worrying if you want to delete something in between the chain. - Bypass function: turn on and off the operations to try variations on your model. It’s like having layers.
- Automatic computation of visible elements:
when you change the visibility of the operators, all the non-relevant nodes
are turned off, giving you faster iterations also on very long chains! - Reference copy: a powerful way for using same input meshes on multiple networks.
- Smarter color highlighting: when selecting an operator from the stack, the involved elements are highlighted.
- Global compute, but per network: if you turn off the computations, they are
off only on the current network of objects. - Shader Selection: choose between hard mesh default shaders or select your own for the resulting meshes.
- Isolate Elements: isolate the Hard Mesh elements when working on them.
Global or local display of inputs: - When working with many operators it can be confusing to see all the involved input meshes.
The new system lets you choose to display all the inputs, or only the ones involved in the current selected operation. - Maya Layers are no longer used. Internal layers on every connected object.
- Activate UI from curves. Now by selecting a curve the UI is activated.
Core :
- Improved stability
- Improved normal preservation algorithm.
- New multi mesh support, you can have multiple meshes from the B side of the operation.
- Improved blending geometry algorithm.
- Improved splitting algorithm.
- Improved UV preservation. Now all the mesh shells are pushed through the nodes allowing you to mantain the initial UV for a final edit.
- New memory management, based on memory pool system.
It gives more efficient and faster management of all the computations.
Documentation :
- New visual layout.
- Animated images for explaining the most important features.
Current Limitations and Modeling Guidelines
Layers can’t be used on input meshes:
Please note that since starting from version 2.1 the Maya layer system is not used, and replaced
with an internal layer system, the use of standard Maya layers will break the connections with
the HardMesh internal layers. For avoiding errors, please do not use them directly on Hard Mesh objects.
If you need to use them, simply put your object under a group and use the Maya layers on the new group.Scale of scene matters:
If you work with large scale objects the algorithms will not work. This is a known issue that will be removed in next releases.
We suggest that you work in centimeters with objects no larger than 100 centimeters.No dynamic intersections count:
When you setup 2 meshes for an operation, you can change the shape as long as you don’t create new intersections.
If you start with 2 intersections you can’t end with 3 intersections, the new one will be ignored.
You can use the Update Intersection feature while waiting for a full dynamic intersection updating.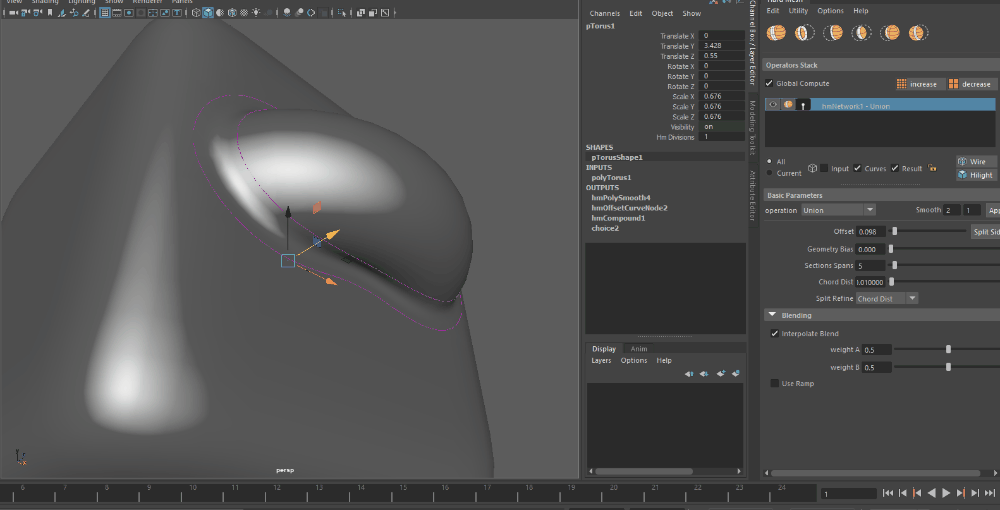
Changing from 1 to 2 intersection. The dynamic intersection is not yet available, but you can easily fix that.
Geometries normals should face out:
In order to avoid unexpected results, the normals of the meshes should point always outside. Inverted normals will always give unexpected behaviors.
An easy way for checking it is to activate the cackface culling mode on your current view pane.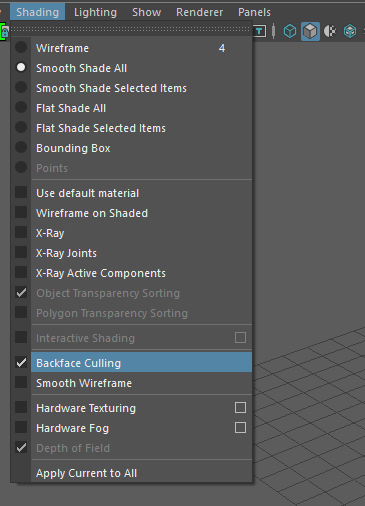
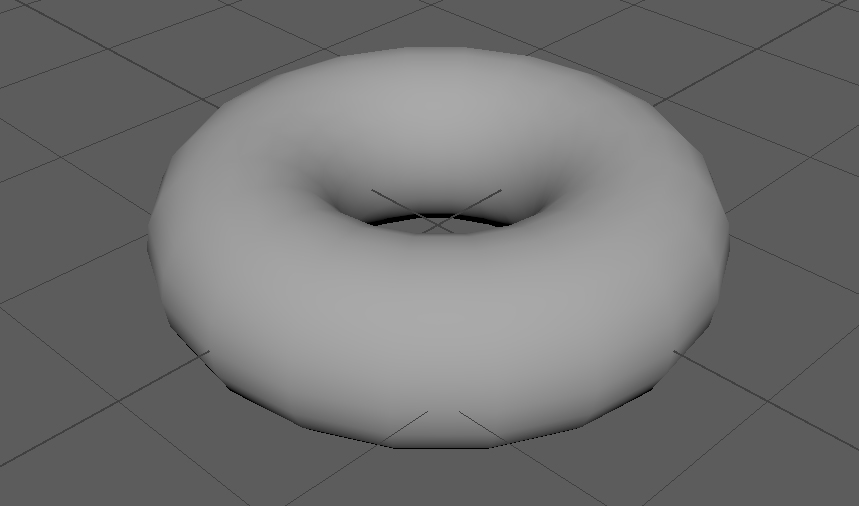
Activate Backface Culling. Normals in the right direction with backface culling on. Normals in the wrong direction with backface culling on. Geometries should be clean:
Even if we can work with almost any face shape (quads, triangles, ngons without crazy edge number..) the mesh that you give to Hard Mesh should be clean.
This means, welded vertices if they share the same space, no nonmanifolds, and all the things that a modeler should check while modeling.No Holes on faces:
Don’t try to perform operations that will end up with a hole on a single face, they will not work.
Low density geometries are supported, but medium to high mesh densities are usually better.
Operation performed without enough subdivisions. By just adding one subdivision on the plane the operation is succesfully performed.
Development
Small Nodes:
The simple nodes for cutting from curves or for blending from edges will be released later.
This will give you the ability to use some HardMesh core algorithms as separate modeling tools.Mesh Library:
A mesh library optimized for HardMesh purposes, but not limited to only HardMesh,
is planned to be included in the next major release.
Installing Hard Mesh
 |
 |
|---|---|
| The installation window on Windows | The installation script on Linux/Osx |
Please note:
In order to install the plugin you need administrator rights on your machine
Installation
How to install on Windows:
- Unzip/unrar the HardMesh archive anywhere on your system.
- Locate the folder with the plugin
- On Windows: Install Hard Mesh from hm_setup.exe.
- Open Maya to activate the product. jump to the licensing section
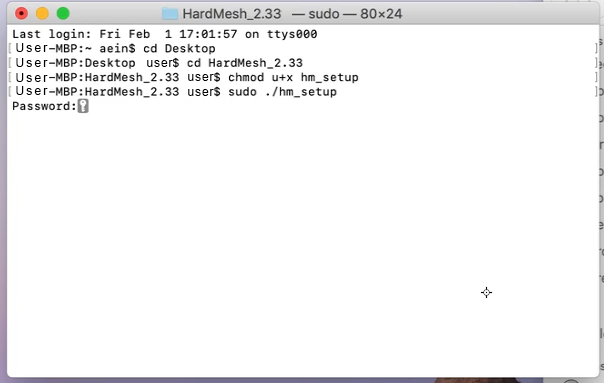
How to install on Linux/Osx:
- Unzip/unrar the HardMesh archive anywhere on your system.
- Locate the folder with the plugin
- Open the terminal with adninistrator rights
- Navigate to the plugin folder and run the hm_setup script
- Open Maya to activate the product. jump to the licensing section
Manual Installation
If you prefer you can install Hard Mesh manually.
HardMesh uses the Maya modules for finding all the needed elements to work.
You can leave the files wherever you prefer and create the necessary files for letting Maya find it on your machine.
How to manual install:
- Unzip the HardMesh archive anywhere on your system, copy the path.
- For installing it just for your user, go to your Maya version preferences that is usually located in: C:\Users\user\Documents\maya\version\modules
- For installing it for every user go to:
C:\Program Files\Autodesk\Maya20XX\modules - Create a new text file called hardmesh.mod
- Make sure that .mod is the extension and not in the name of the file.
Open the file, and paste the following lines:
File Content:
+ HardMesh any REPLACE WITH YOUR PATH
plug-ins: plug-ins/MAYAVERSION_OPERATING_SYSTEM
Paste the path of the root where you have unpacked the plugin instead of the REPLACE WITH YOUR PATH string. .
- Now write the maya version separated by an underscore and the operating system.
Ex. 2018_win.
Valid os are: win, osx, linux - Save the file.
Now when starting Maya you should find the file hmTools.mll inside the plugin manager.
Remember that you need to activate Hard Mesh in order to load it.
Licensing Hard Mesh
Once you have installed HardMesh, you can activate your license.
Follow the steps depending on the licensing option that you have chosen.
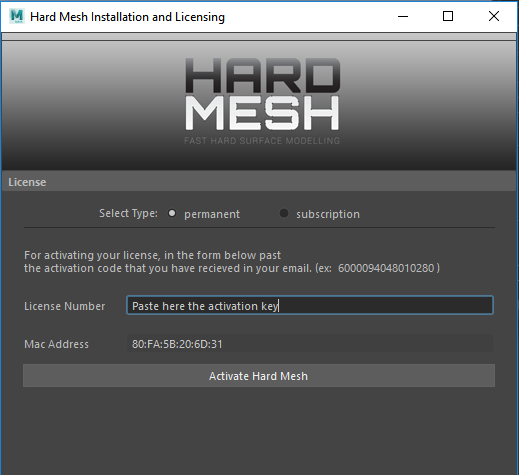
NODELOCKED Permanent License - 30 Days TRIAL:
- Install Hard Mesh (installation instructions above)
- Once installed, open Maya, open the file hm_licensing_tools.ma
- A window will appear asking you to insert your activation key.
- Paste the key that you recieved in your purchase email and click “Activate Hard Mesh”
Important note
An internet connection is required for obtaining the license.
Please check that your firewall or anti virus is not blocking Maya from reaching our server.
If your computer is not connected to the internet for security reasons go to Remote Activation
After your activation is done, you can load the plugin, the HardMesh menu will appear in the menu bar of Maya.
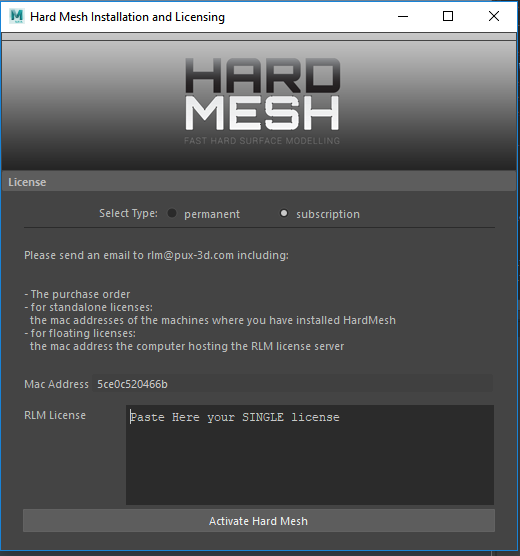
SINGLE Subscription License:
A subscription license will require you to send to us your computer mac address in order to get back
a valid license file and starting to use the plugin. Follow the steps below.
- Install Hard Mesh (installation instructions above)
Sending your computer data to get the license file:
- Once installed, open Maya and open the file hm_licensing_tools.ma
- Click on the subscription section to get the mac address of your machine
- Send it to subscription@pux-3d.com with your order details
Using your license file:
- You will receive a license file in your email
- Open Maya, open again the file hm_licensing_tools.ma
- Click on the subscription section, paste the content of the license in the field below your mac address
- Click on the activate button
 |
|---|
| Getting the mac address for the subscription. |
Installing a FLOATING license:
The floating license will need you to have a RLM server running on a network machine.
You will have to install HardMesh on every client machine, and activate one license file for the server.
Sending your server computer data to get the license file:
- Get the mac address, through the rlmutil file that you can find under the license_server folder
below a screen capture with the process, here is the command executed:rlmutil rlmhostid ether - Send it to subscription@pux-3d.com with your order details
 |
|---|
| Getting the mac address for the subscription. |
Using the license on the server:
- In the plugin structure, there is a folder called license_server
you will need to have the content of this folder on your server machine - Once you have the license server copied on your server, place the license file
that we sent you inside the RLM server directory. Same folder of the rlm executable - If for some reason the license file has to be located inside another directory,
use environment variable RLM_LICENSE to point to it (the directory). - Start the RLM server and make sure that no firewall is blocking it.
- When you open Maya on a client machine, when you load the plugin the server will give the license to it
License server administration:
- Open an internet browser on the computer where the RLM server is running
and type “localhost:5054” in the URL field. This will show you the RLM administration options,
where you can check the status of a license, see which computers are using licenses, or stop/start the server etc. - To change the default RLM license port if other applications are already using it - edit the first line
of your license file and change port 5053 to something else, then restart the RLM server. - If there is an RLM server running, simply put the floating license file next to the other
license files already in use and restart the server. - For more detailed information visit http://www.reprisesoftware.com/RLM_Enduser.html
Remote Activation for Permanent Licenses
If for some reason the computer where you will use Hard Mesh has no internet connection you can send us your mac
address for a remote activation process.
For avoiding errors, is better that you use our library for getting the mac address, otherwise it could not work.
Please keep in mind that after sending to us the mac address it might take 48 hours or more for receiving the license.
Getting the MAC address with pux library:
- Open Maya
- Open the “hm_licensing_tools.ma” under the root folder
- Copy the Mac Address field
- Send the result to: support@pux-3d.com and we will send back the license file.
 |
|---|
| Manually getting the mac address. |
Saving the license in the right place:
- After you have received the email, you need to paste the license file in the right place.
- Paste it in the current user pref folder, usually located in:
C:\Users\User\Documents\maya. - You are done. Open Maya, and load Hard Mesh. Happy modeling!
Removing Hard Mesh
For cleanly removing Hard Mesh from your system:
- Simply delete the file hardmesh.mod located under your Maya modules folder:
Ex. C:\Program Files\Autodesk\Maya20XX\modules
HardMesh Workflows
Depending on your needs, HardMesh can be used in many different ways in your production workflow. Let’s take a look at how we can use the power of HardMesh in different situations.
Concept modeling
You can use HardMesh for creating concepts for your 3d model, while keeping everything in history. In this way, you are always able to edit
and change the shape of your model for experimenting with all the freedom you need.
Key Options:
Geometry Bias is set to 0 and Split Refine is set to Chord Dist. Smooth Mesh is Low since we want to keep the interaction fast.
Super low-res geometries (like a cube without subdivisions) should be avoided though.
 |
|---|
| Suggested Options for concept are the default options. |
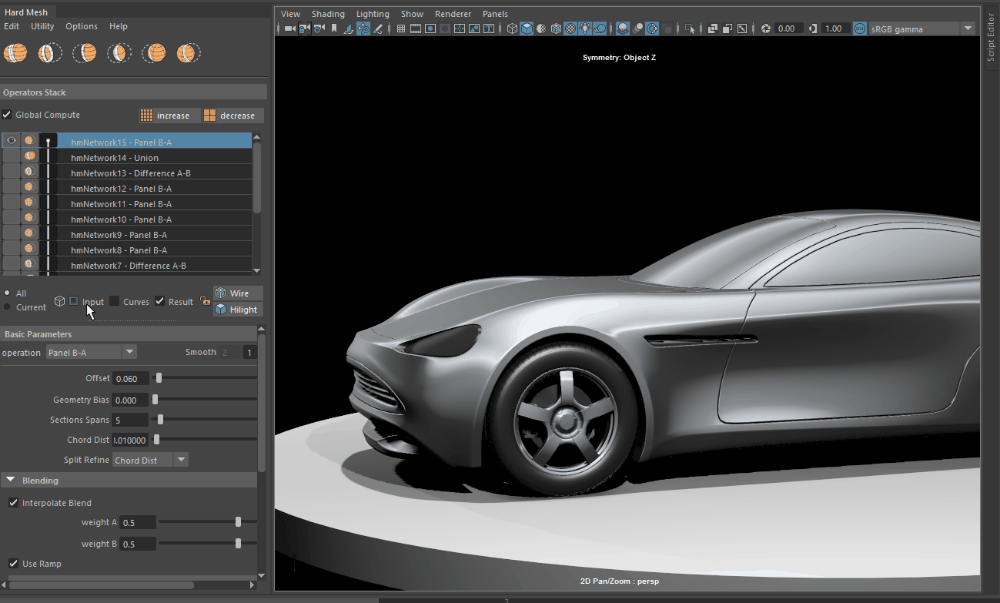
Topology Modeling Tool
If you already know what you want to model, you can use the HardMesh tools for helping you with the creation of the right topology for your model.
By using a HardMesh operation as a starting point, you will save a lot of time by just fixing the edge flow where you need it.
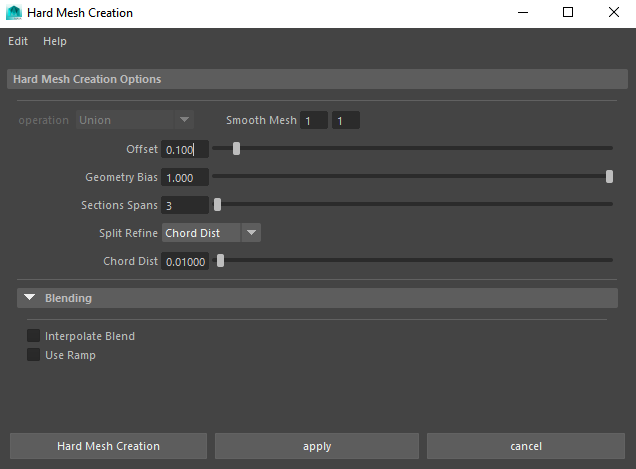
Key Options:
Geometry Bias is set around 1 and Split Refine is set to Off and Chord Dist is around 1 as well.
By setting the Geometry Bias to 1, the vertices on the geometry are snapped on the Offset curve before cutting and no extra polygons are added from the split refine. By setting the Chord Dist with high values, no extra subdivisions will be added on the blending strip.
In this way we have the least possible geometry as a starting point for creating the edge flows that you need. Keeping the Sections Spans to 3 will also avoid having too many details on the blending, assuming that the whole model will be subdivided in the end.
We also left Off the Interpolate Blend, in this way you will have a more squared blend, ideal for modelling operations.
 |
|---|
| Suggested Options for using it as modeling tool. |
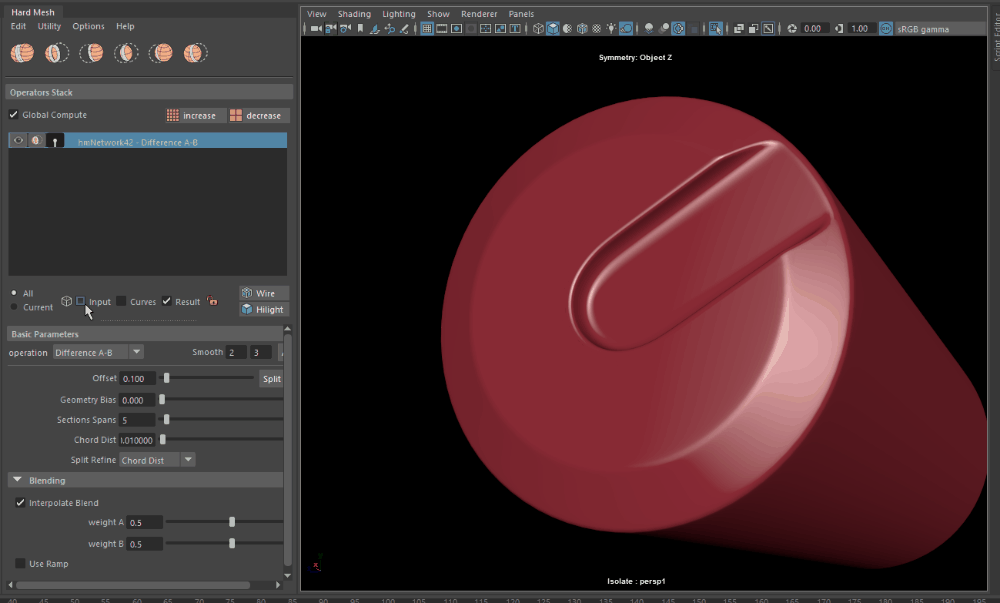
Details Enhancer
In some cases creating some Hard-Surface details by topology can be a nightmare and extremely time consuming. In these cases you can use
HardMesh for adding that extra detail that will make the difference on your 3d model, without having to deal with super complex topology.
Use higher levels subdivisions and go ahead with your detailing!
Key Options:
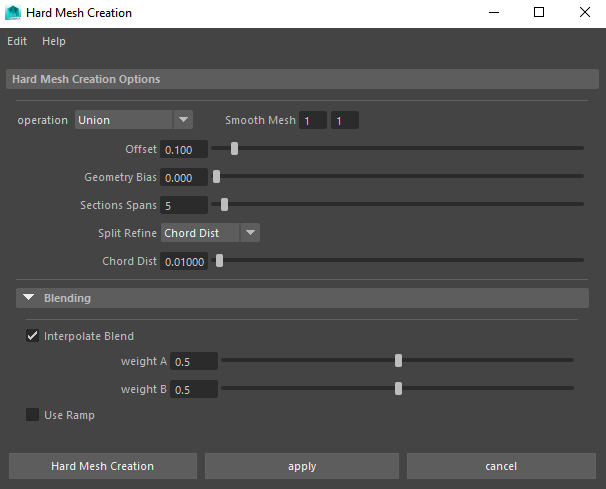
Geometry Bias is set to 0 and Split Refine is set to Chord Dist. The Chord Dist parameter has low values for preserving the curvature of the splitting. Smooth Mesh is High since we want to use the output model as it is. In the example below we are also using the ramp feature that gives us the control over the profile of the Blend.
 |
|---|
| Suggested Options for using it as modelling tool and ramp. |
The Workflow window
The workflow window is the core for creating, managing and editing the HardMesh operations.
Jump To:
Starting from 2.1, the interface adds the new operators stack, a better way to display, edit and organize your operations.
Every time you select an input mesh, a curve or a result mesh, the UI will automatically load all the data you need.
The operator stack will be populated with a chain of all the operations that are involved and the options for editing
the selected operator are displayed on the bottom part of the window.
 |
|---|
| the updated UI |
Creation
The creation part of the workflow window is located on the very top part with a preset of common used operations.
Every icon corresponds to a different kind of operation. Remember that the operation can always be changed at any time.
By double clicking on one of the icons you will be able to open the setting to use for the next operation you want to create.
 |
|---|
| Union, Difference A-B, Difference B-A, Intersection, Panel A-B, Panel B-A |
New Operation
How to:
Select 2 meshes.
Click on one of the creation icons.
Double click for opening the creation options.
Remember that:
Currently Hard Mesh supports 2 meshes for operation, if you have multiple meshes from one side we suggest to combine them.
This limit will be removed in future releases where all the mesh in the selection after the second one will behave as “side B” meshes.
 |
|---|
| Creating a new operation takes just 3 clicks. |
Cascade / Chain Operation
The process of creating a new operation, on the result of another operation is the basic concept that makes working with Hard Mesh powerful while keeping it intuitive.
How to:
Select the result mesh of an Hard Mesh operation and another mesh that is not involved in an Hard Mesh operation.
Create a new operation with these 2 inputs.
You have created the first step for a chain of operations.
Remember that:
Branching of operators is not allowed. This means that you can’t create an operation if:
One of the two meshes is already an input mesh of another operation.
Both meshes are the result of another operation.
This limit is introduced for keeping the generation of cascade operations linear and easy to edit.
Use **Utility >> Reference Copy** for creating the effect of branched operation, while keeping the chain linear.
 |
|---|
| Creating a chain of operations. |
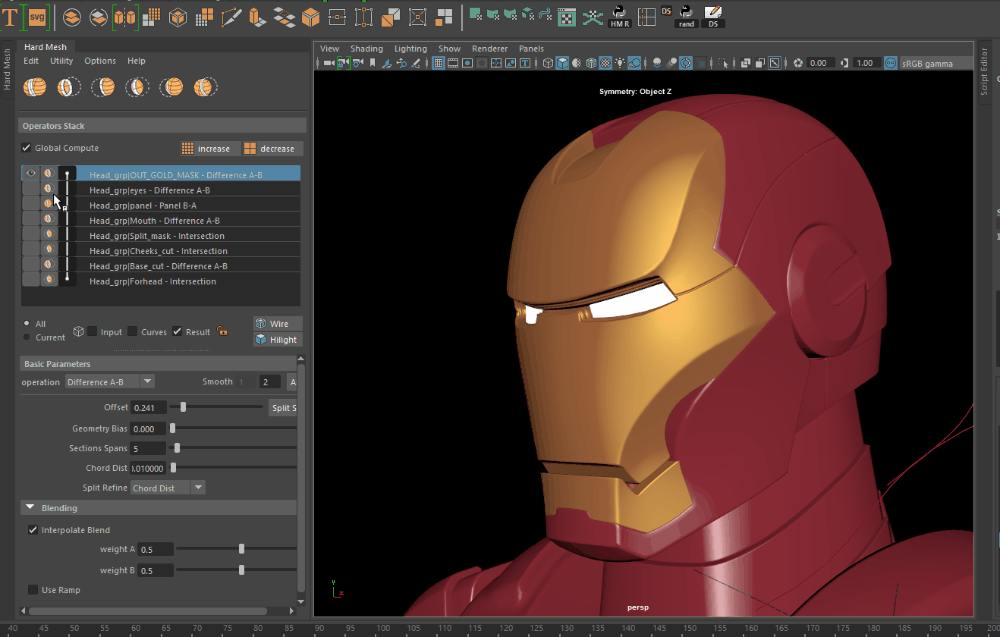
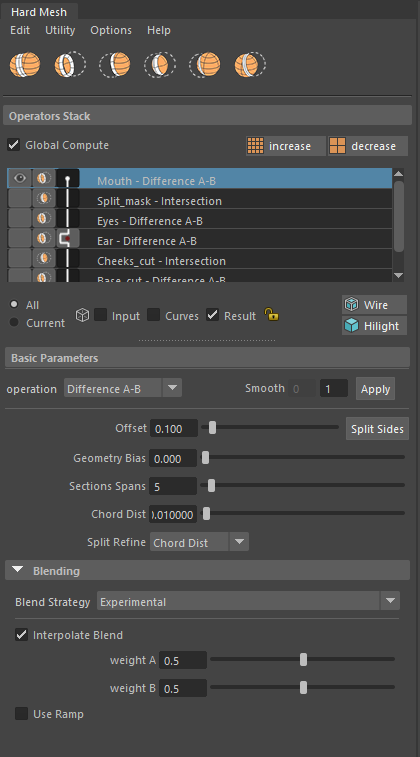
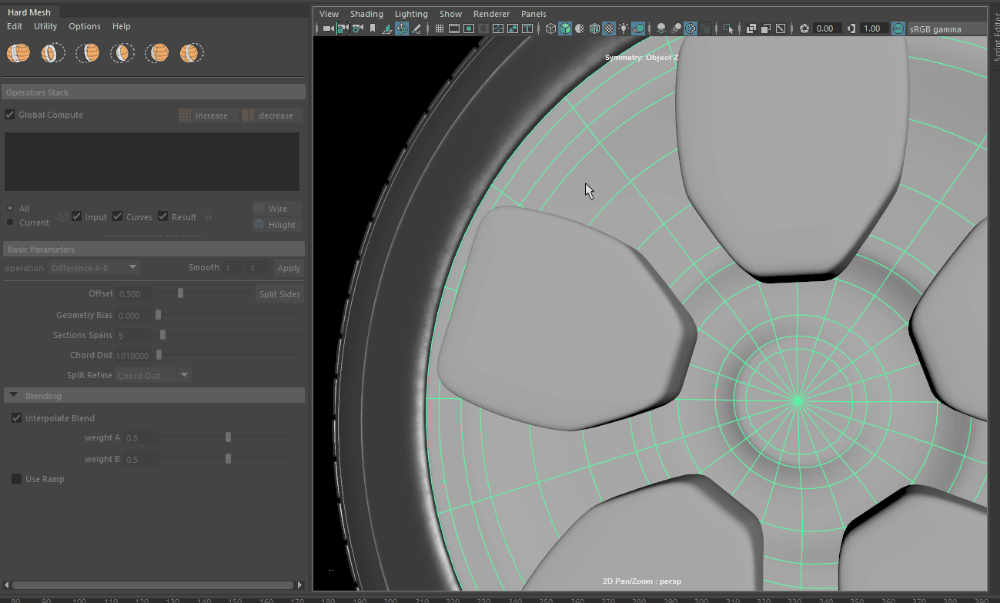
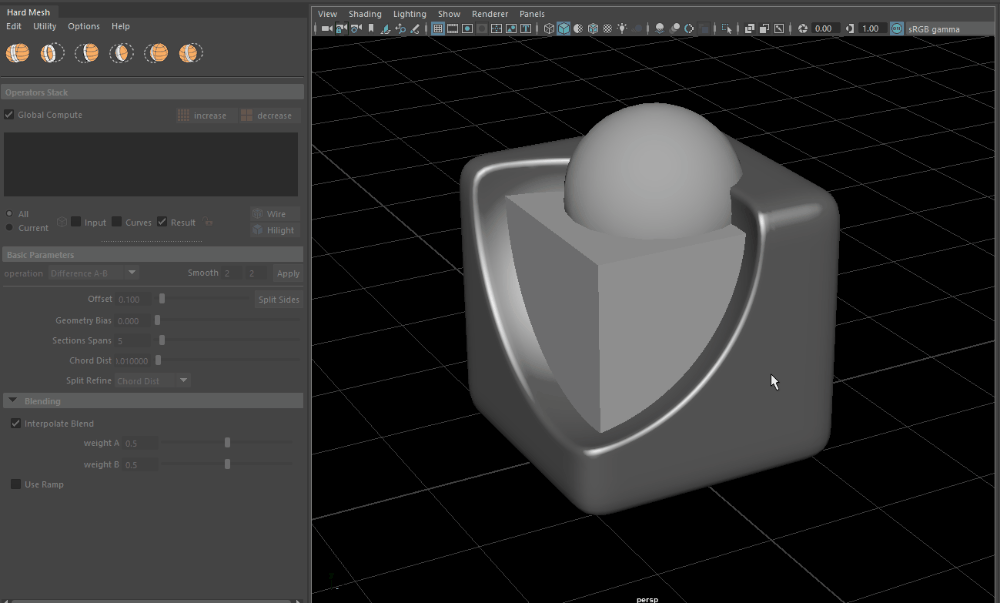
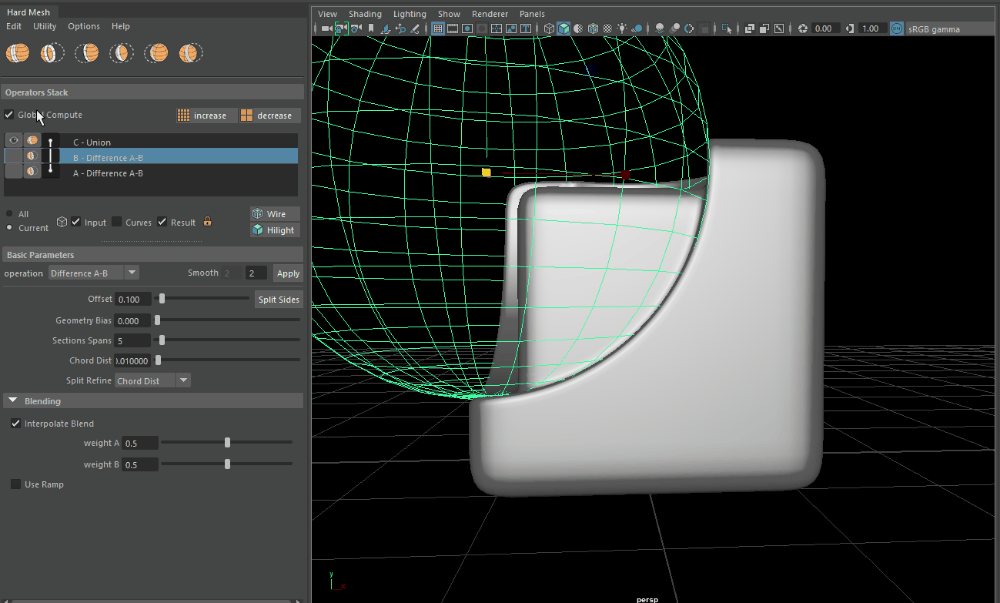
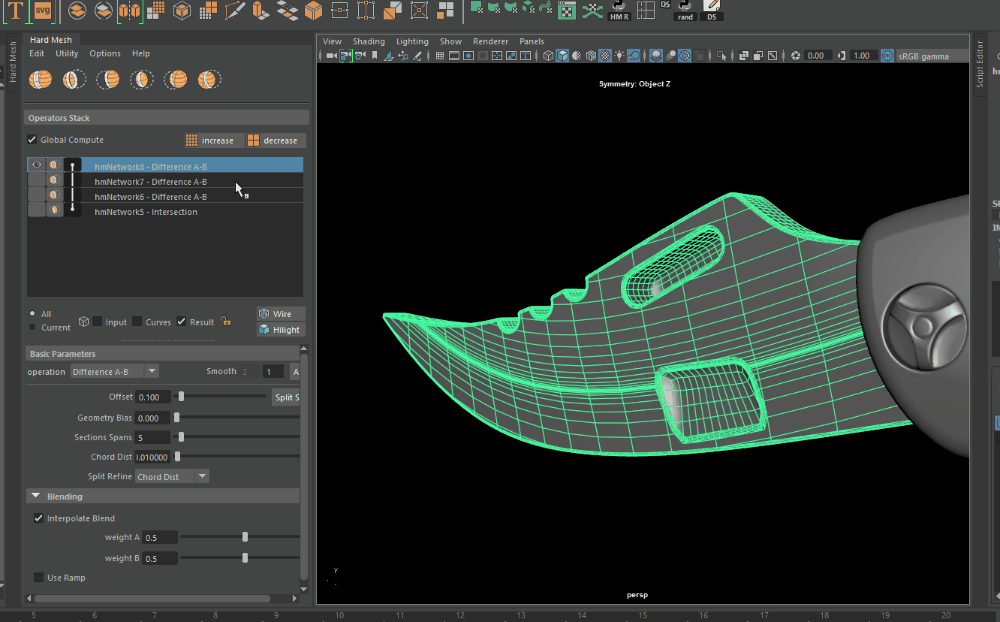
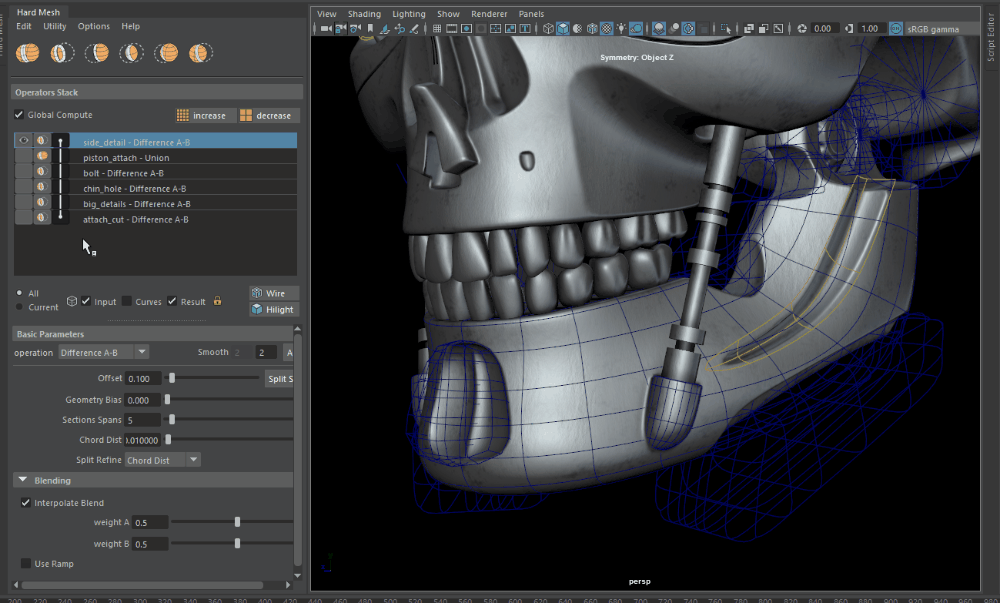
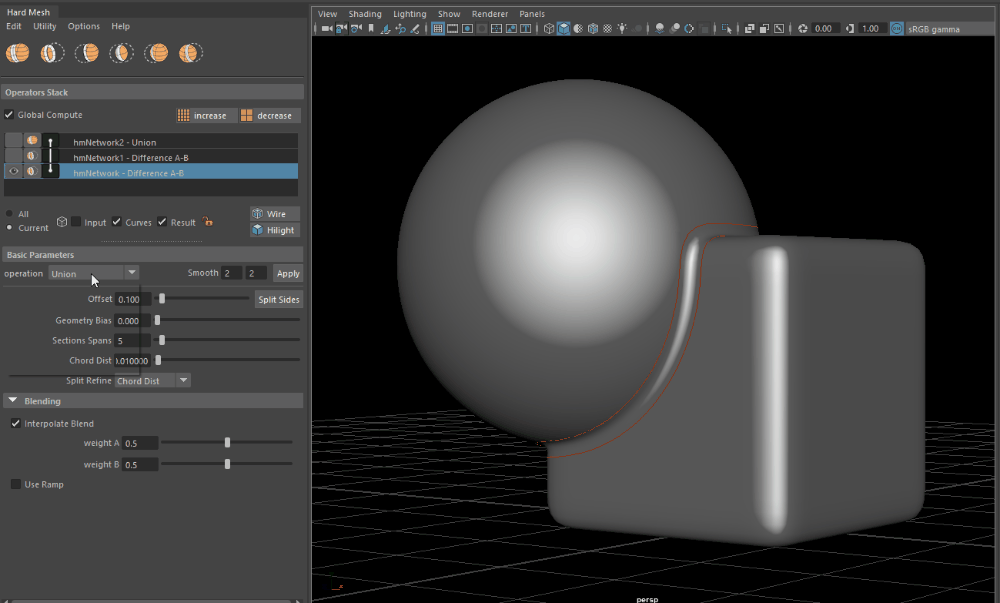
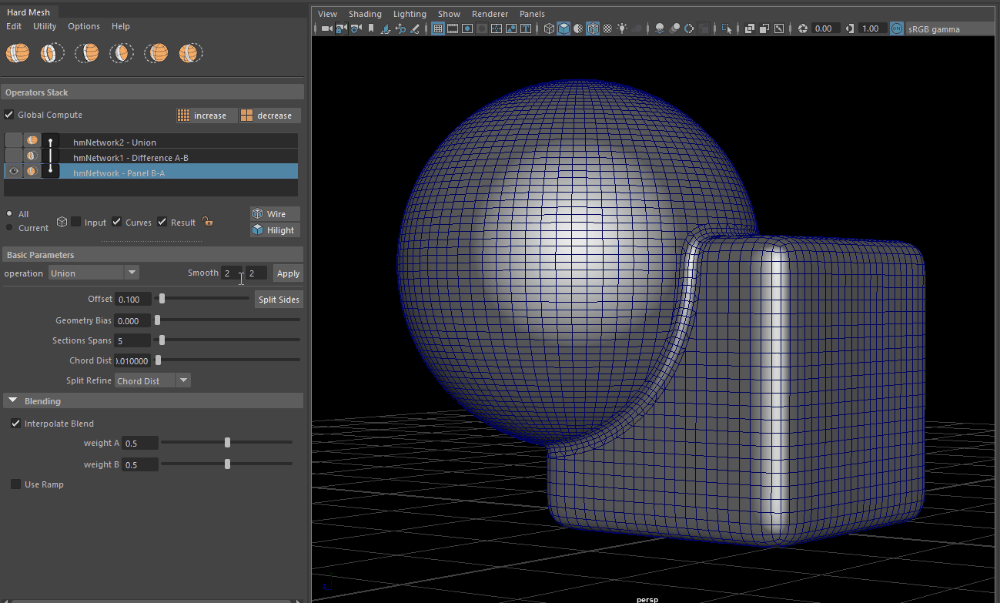
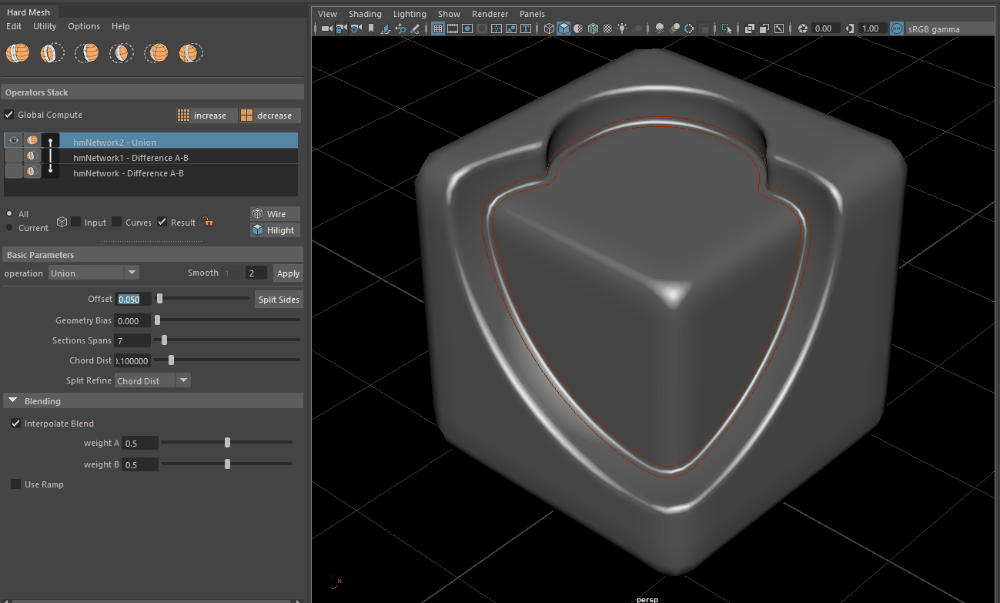
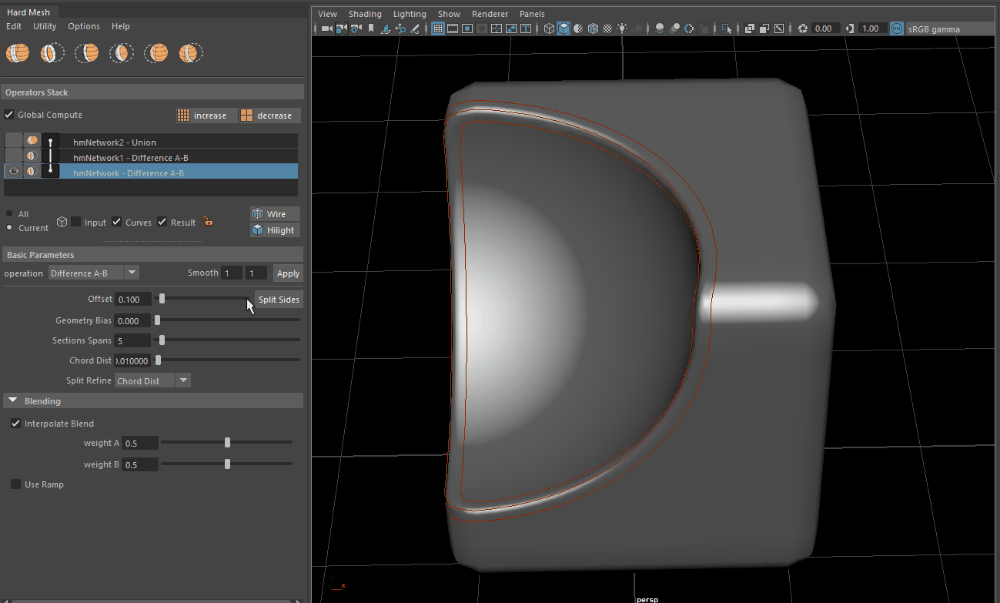
Operator Stack
The operator stack in the evolution of the preview operator selector. It gives a better control over the currently involved operations, featuring the new bypass feature and operator reordering.
The very top part affects all the operators in the chain.
In the center part each operator is displayed from the first of the chain, on the bottom part, to the last of the chain, on the top part.
The last part of the operator stack is for managing the visibility of the network and scene.
Global Compute
The “Global Compute” turns on and off the computations for all the Hard Mesh nodes in the current operator / chain of operators.
This allows you to make modelling edits, and see the result in a later time by turning the computations on again.
How to:
Turn off the Global Compute.
Make your modeling edits.
Turn it on again when done.
Remember that:
The intersection count is not dynamic, if while modeling you add or increase the number of intersection points
You will have to run the update intersections command located under the edit menu.
 |
|---|
| Turning off the computations is a great way for modeling an input mesh when you don’t need the result to be updated. |
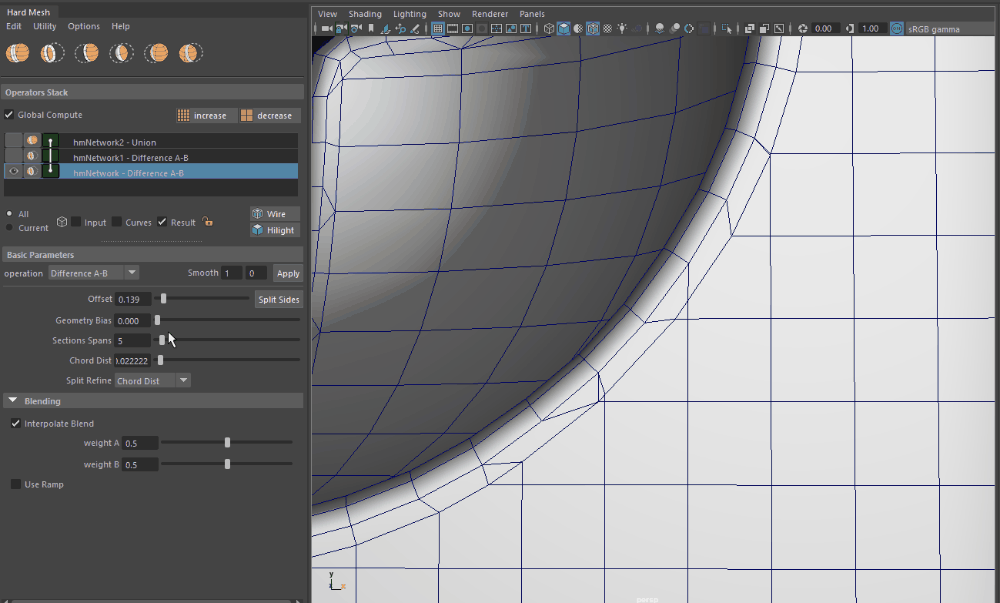
Operators Resolution
Change the smooth level of all the involved input meshes of the chain.
How to:
Select an object involved in an Hard Mesh operation, the UI will load the data.
Click on increase for adding 1 to the level of subdivision of the input meshes.
Click on decrease to remove 1 to the level of subdivision of all the input meshes.
Remember that:
The splitting and offset computations tend to be more stable with mid to high resolution geometries.
Lowering too much the resolution can give incorrect results.
 |
|---|
| The effect of the resolution change. Notice that instead of applying the smooth after, like in a regular workflow, we apply it before the end result. |
Operators Visibility
Lets you move between the different output mesh visibility in a chain of operations.
How to:
- Click on the first icon to move the visibility of the current operator.
Remember that:
- You can’t display more than one result since the result mesh visibility is exclusive.
 |
|---|
| Moving from the bottom to the top of visibility gives an idea of all the steps used in the modeling of the object. |
Operators Delete
Remove a selected operator from the chain.
How to:
Select the operator that you want to remove, you can do that from the scene or from the stack.
Right click on the stack and press delete, alternatively you can go on the top menu and click edit >> delete.
The input mesh will be disconnected an reset to a normal mesh, you can delete it or use it for other purposes.
Remember that:
You can delete an operator located anywhere in the chain, except the first one.
You can’t delete more than one operator at once.
 |
|---|
| Deleting an operator that we don’t like is easy. |
Operators Reordering
Change the position of an operator in the chain of operations.
How to:
Click with the middle mouse button the operator you want to move.
Hold the click and release where you want to insert the operator.
Remember that:
- You can’t move the first operation
 |
|---|
| A simple example of operation reorder, notice how much it can affect the final result |
Operators Bypass
Turns on and off the effect of an operator.
How to:
Click on the middle icon to turn off the operator, the icon will change.
Click again to turn it on.
Remember that:
Turning on simultaneously 2 or more operators that act on the same part of the mesh
might gives errors and instability.
You can’t turn off the first operator in the chain.
|
|---|
| Turning on and off the operators opens up a layer style workflow. |
Operator Isolate
Isolate the selected operator elements in the current Maya model panel.
How to:
Click on one operator that you want to work on.
Right click and select “isolate current elements”.
All the other operators will become grayed out and locked.
Make your changes to the input meshes.
Once satisfied, click again on the “isolate current elements”.
Remember that:
Don’t change the standard Maya isolate view mode when you have the Hard Mesh one active.
If you do it, you will just have to do it also from the Hard Mesh workflow window to unlock the update of the window.
 |
|---|
| Isolating the current elements is a great way for focusing just on the current operator inputs and result. |
Input Visibility - All / Current
Display all the input meshes or only the ones related to the current operator.
How to:
Activate the UI by selecting an Hard Mesh object.
Make sure that one input type is visible by checking that “Input” or “Curves” is active.
Choose if you want to display all the involved inputs by clicking on “All” or if you want to display
just the inputs of the current operator by clicking on “Current”
 |
|---|
| Display All the input or the Current inputs. |
Input Mesh - Wireframe / Shaded
The icon on the left side of the “Input” lets you turn on and off the wireframe for the input meshes.
You might need to turn the wireframe override off while modeling the input meshes with the “Global Compute” off, for avoiding the update of the results while focusing on the shape editing.
How to:
With the input icon checked, click on the cube icon.
It will act as a toggle for the wireframe mode.
 |
|---|
| Activating the shading of the current Input meshes. |
Visibility - Input / Curves / Result
Every Hard Mesh operator is composed from the input meshes, the intersection and offset curves and the resulting mesh.
The checkboxes located in the visibility sections are the best way for switching the visibility on and off.
How to:
- Click on the checkbox to turn on and off the visibility of the specified type, for the current chain of Hard Mesh objects.
Remember that:
By default the result mesh is only selectable when the input meshes are hidden.
You can unlock the result mesh any time by acting on the lock icon, or by turning off this behavior
by going under Options > Auto lock / unlock result.
 |
|---|
| Turning on and the visibility of the Hard Mesh elements. |
Wire / Hilight buttons
While working with Hard Mesh, you might want to turn off the selection hilighting for concentrating on the shape, without the visual noise of the wireframe.
On the other hand, you might want to see the wireframe on all the objects, for concentrating more on the way the polygons are edited from the operations.
These two buttons give fast access to both features.
 |
|---|
| The viewport utility buttons. |
Edit Parameters
The edit section allows you to change the parameters of the current operation.
Operation
In any moment you can edit the operation type of an Hard Mesh operator.
How to:
With an Hard Mesh operator selected, click on the drop down menu operation
Select the new operation.
Remember that:
- The panel operations gives the panel effect when used with the ramp.
 |
|---|
| Select the operation that best serve your modeling needs. |
Smooth
The smooth process, while working with Hard Mesh, has to be considered an intermediate phase; not the final one like in the traditional polygonal modeling.
Ideally we want to keep the input meshes with as low polygons as possible, to keep them easily editable, and set a smooth value good enough for our final mesh.
Since everything remains editable until you use the clean object / scene command, you can work with a lower smooth, for speed, and increase it just before cleaning or while proceeding with the modeling.
How to:
With a Hard Mesh operator selected, click on one of the two Smooth boxes.
Set the new Smooth value.
Click on the apply button.
Remember that:
The smooth parameter acts only on the current operator, not on all the operators in chain like the “Increase” and “decrease” buttons, located on the top part of the Operator Stack.
For better results, when possible, keep the mesh density similar on both sides.
 |
|---|
| Swapping the resolution between 0, the original poly count, to 2 a smoothed level. |
Offset
The offset parameter determines how big the blending is starting from the intersections.
How to:
- Move the Offset slider or input numbers in the field.
Remember that:
Very big offset values might give bad results.
If you see that you need a very big radius for the shape that you have in mind,
it might be a good task for traditional topology modeling.
If the generated Offset curves intersect each other, the computation will fail.
Creating a different operation in this case might be a good solution.
 |
|---|
| Changing the offset value. |
Offset / Split
The Split button of the offset gives you an independent control over the two sides of the offset.
How to:
Click on the “Split Sides” button
Change the offset independently on each side.
Click on Merge sides to merge the parameters again.
 |
|---|
| The Offset changing on each side. |
Geometry Bias
The Geometry bias determines how much the geometry points are snapped on the offset curve before cutting.
You might want to use it when using Hard Mesh for getting basic topology to edit.
How to:
Set to 0 for cutting the geometry without moving points.
Set to 1 to snap first the points on the curves, and then cut.
Remember that:
- When you use the “Geo Bias” to 1, turn off the split refine if you want to add the least amount of geometry.
 |
|---|
| Notice how the vertex near the cut is moved when increasing the parameter. |
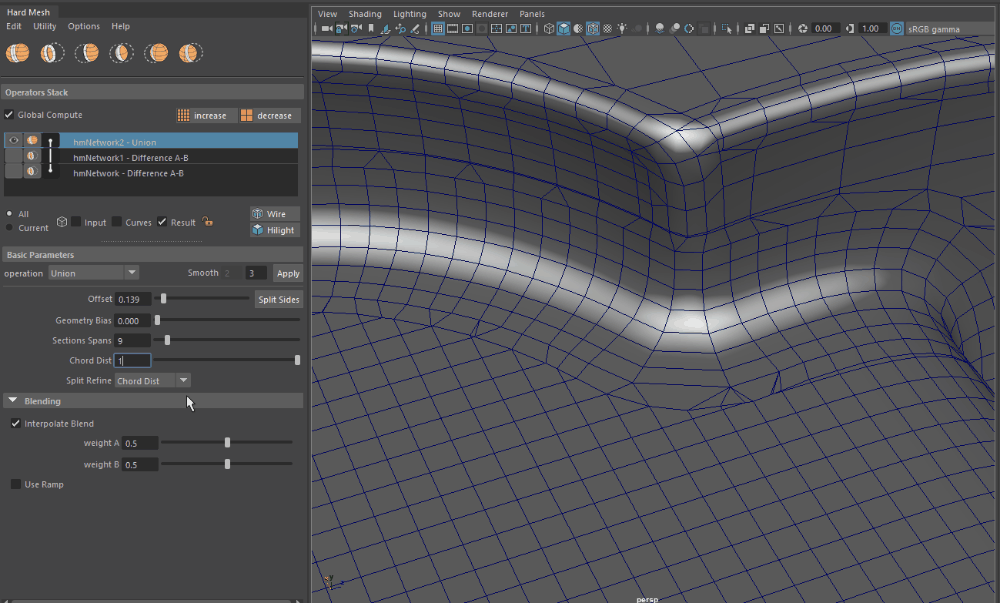
Section Spans
The Section Spans let you change the resolution of the blending strip.
How to:
- Move the Section Spans slider or input numbers in the field.
Remember that:
- For better visual results, choose a number that gives a uniform mesh density with the surrounding meshes.
 |
|---|
| Section Spans change. |
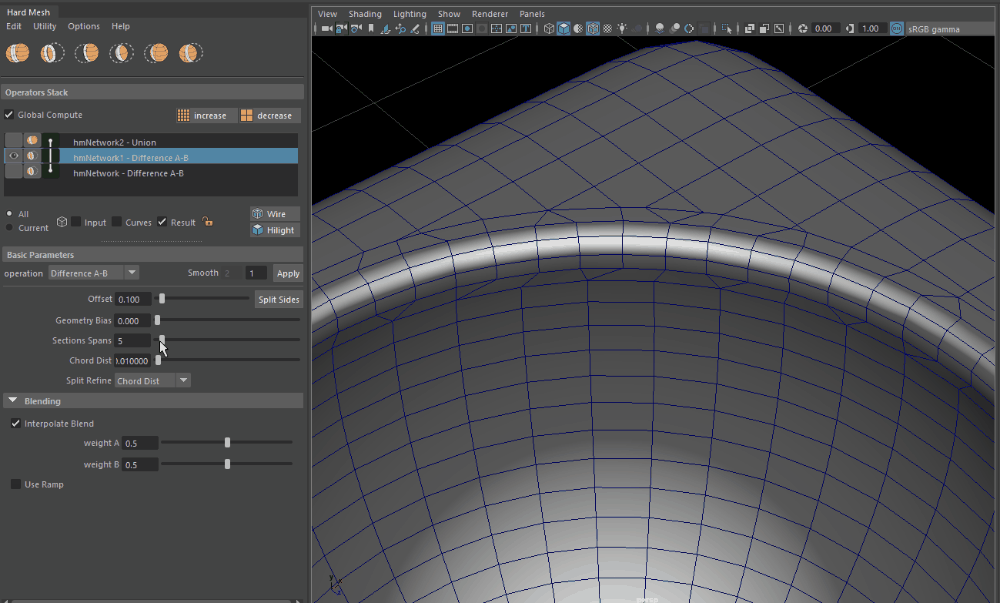
Chord Dist
The Chord Distance parameter defines the tolerance that is used for generating the section profiles of the blending strip.
The lower the value, the higher the resolution.
How to:
- Move the slider or manually input the number.
Remember that:
- When increasing the resolution, while lowering the number, use the precision of the number insertion.
 |
|---|
| Changing the Chord Dist between 1 and 0.001. |
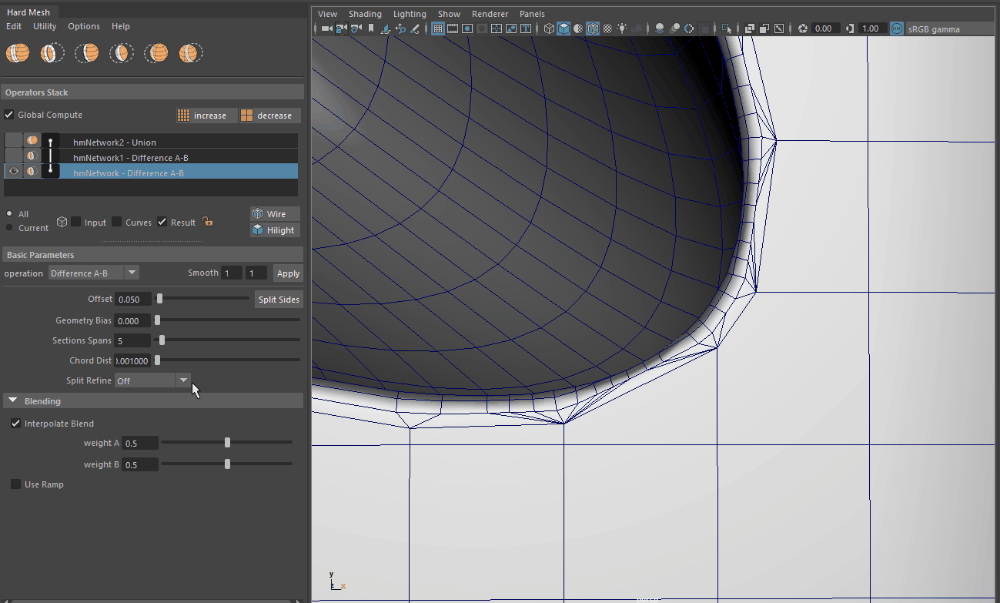
Split Refine
The Split Refine sets the policy to use when splitting the mesh from the offset curves.
Off:
- The split will be made only where the curves intersect the edges of the geometry.
Chord Dist:
- After splitting on the intersection curve-edge, the split will be refined within the value provided from the Chord Dist parameter.
Smaller values will add more resolution points in the split, bigger values will use less points.
Strict:
- The real offsetted points will be used for cutting the geometry. This is the simplest split, but gives bad visual results.
How to:
- Select the preferred method in the drop down menu.
Remember that:
Even though the chord dist and the strict might look similar they are very different.
The Strict does not offer you the control over the refining, the chord dist let you chose the resolution through the Chord Dist parameter.
 |
|---|
| Changing the Split Refine. |
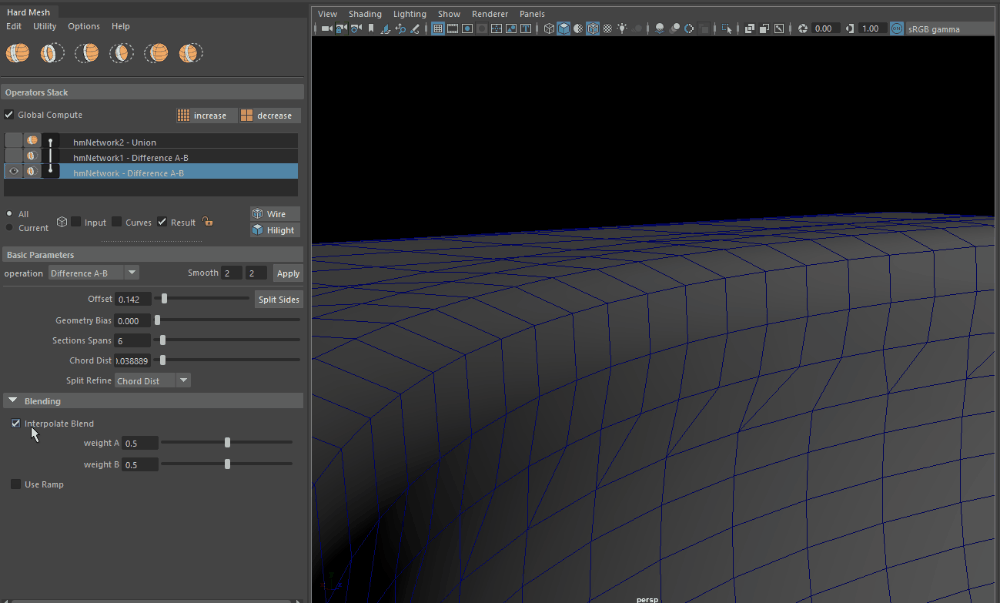
Interpolate Blend
Turns on and off the interpolation of the profile curve.
How to:
- Click on the checkbox for turning the option on and off
Remember that:
- With an even number of Sections Spans you can have a “sharp” corner instead of a rounded one since there is an edge loop in the center.
 |
|---|
| Notice how the blending assumes a sharp profile when the interpolation is not computed. |
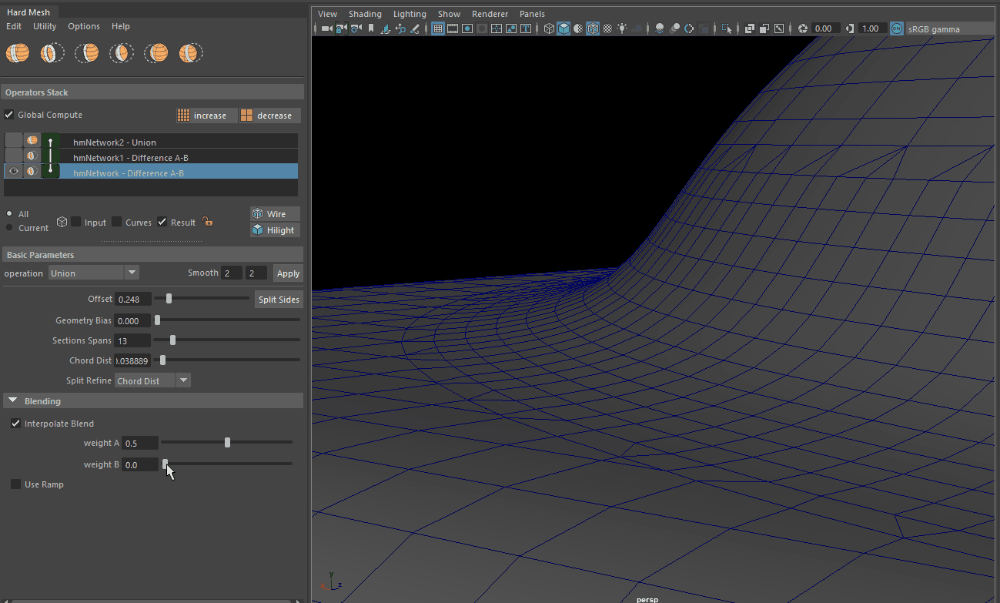
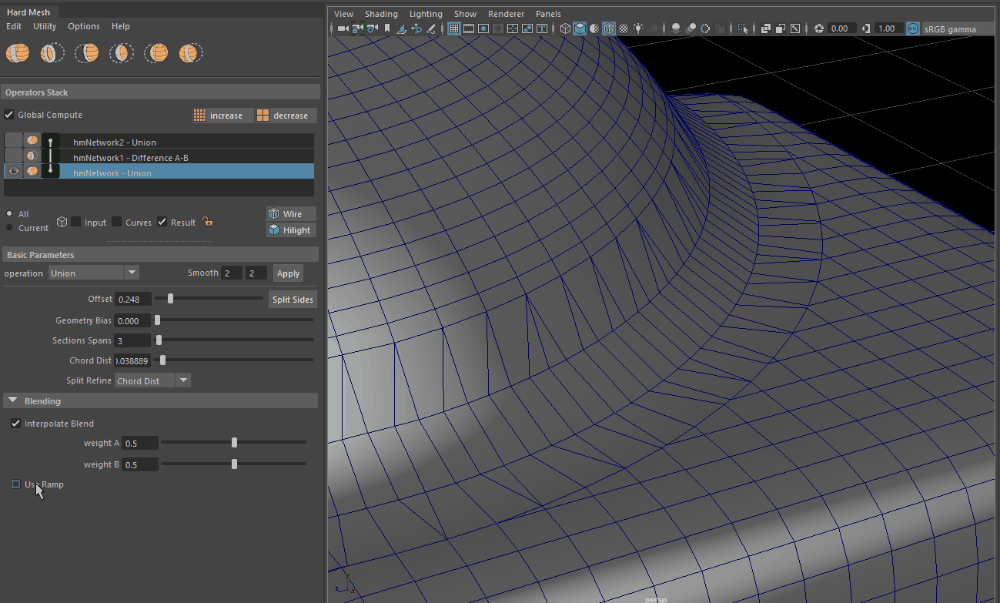
Weight A / B
The Weight parameter determines how much the tangent of the mesh affects the blending strip.
How to:
- Set the value to 0 for using minimum tangent influence of the mesh, and to 1 to use it at its maximum influence.
 |
|---|
| The Weight parameters let you change the profile of the blending based on tangency. |
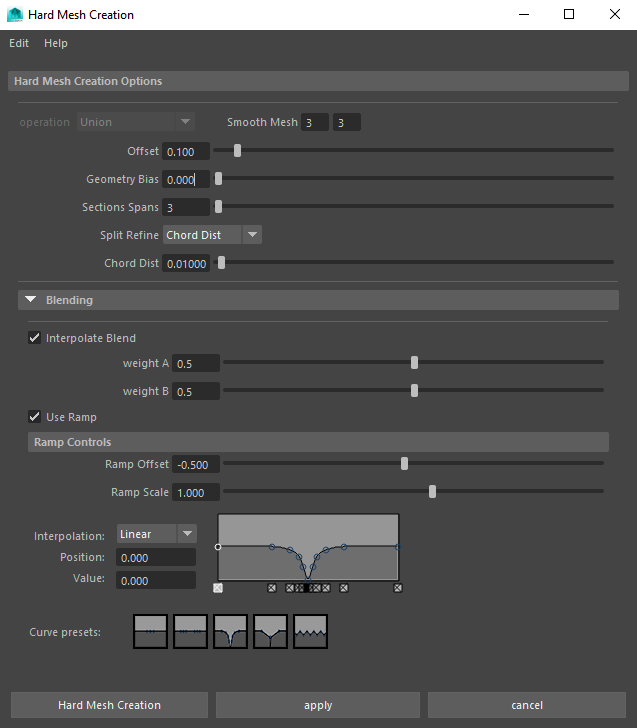
Ramp
The Ramp parameters move the points of the blending strip “up and down” for creating different looking blendings.
Ramp Offset: move all the points inward or outward
Ramp Scale: multiply the values of each point for this value
How to:
Activate the “Use Ramp” parameter.
Move the points for changing the profile.
Remember that:
When the ramp mode is active, the Section Spans is applied for every section between 2 points.
The interpolation changes the shape of the curve, which affects the number of spans.
 |
|---|
| Activating one of the ramp presets will distort the blending strip. |
FAQ
Workflow
1) Do I need Hard Mesh to open a model created with it?
Hard Mesh relies on custom nodes to let you create models with its own workflow.
For being able to edit the model with the interactive workflow, you need Hard Mesh on every computer that you want to use for editing the file.
However, when you finish your model, you can delete all the plugin nodes from the scene with just one click, with the command Clean Scene under the Utility menu of the Hard Mesh window and just deliver the final model.
2) Why is the resulting mesh not all quadrangular?
Hard Mesh has been created to speed up all the tedious tasks related with the hard surface modeling. Since majority of the time hard surface models don’t need to be deformed, having a 100% quad mesh isn’t necessary.
Other than that, generally speaking, an “all quad” mesh without good edge flows, is not useful.
If for pipeline reasons you need a mesh generated only from quadrangular faces, we suggest to use Hard Mesh as a starting point for your topology and finalize your final model by hand.
3) Can I 3d print models generated with Hard Mesh?
As long as you follow the rules of your printer, the models generated from the plugin are totally compatible with a 3d printing workflow.
Common Errors
1)When I move the input meshes too much the result seems to be broken.
The current version does not support dynamic intersections. Majority of the time when you change the inputs too much, you create new intersection points that are not counted and can break the setup.
When this happens:
- Open the Hard Mesh window
- Select the operator that is giving a broken result
- Right click on it on the Operator Stack.
- Select the update.
This will force the recreation of the intersection curves, adding or removing them depending on the new intersections found.
2) If I increase the radius the blending part looks odd.
The radius value controls how far the offset curves are moved.
Since the main purpose of the tool is to create blendings between meshes, if you are creating too large offsets you are giving hard times to the algorithms that are not created to blend two totally different parts.
If you think that Hard Mesh should be able to solve your case, please send us the scene so we can analyze it and improve the algorithm: info@pux-3d.com
Installation
1) After the installation the plugin is not available on the plug-ins list.
If after installing HardMesh you can’t find the plugin in your plugin manager, there could be different reasons.
Remember that HardMesh is not on the common plugins list located in the Maya installation directory.
Check on the other tabs that point to other directories for finding it.
The current Maya version is not the right one:
You might have installed Hard Mesh on a different Maya version than the one that you are using.
Maya can’t read/find the module file:
If for some reason your module file hasn’t been written, you can check manually in your modules folder located under:
or under:C:\Users\<user>\Documents\maya\<version>\modules
If this folder is empty, you need to create a file called hardmesh.mod, and inside write this content:C:\Program Files\Autodesk\maya<version>\modules
+ HardMesh any REPLACE WITH YOUR PATH
plug-ins: plug-ins/MAYAVERSION__OPERATING_SYSTEM
Paste the path of the root where you have unpacked the plugin instead of the REPLACE WITH YOUR PATH string. .
Now write the maya version separated by an underscore and the operating system.
Ex. 2018_win.
Valid os are: win, osx, linux
2) The plugin is on the plugin manager but it is not loading.
If you are trying to load Hard Mesh but you only have errors there might be 2 main reasons:
- You still need to activate the license. Hard Mesh will not load without a valid license file
- You have installed a version not matching with your Maya version.
- There are some missing libraries.
Licensing
1) When I try to activate the permanent license I get an error:
If when activating the software with a permanent license you get this error, the problem is caused from a missing Redistributable C++ library.
:Error: WindowsError: file C:\Program Files\Autodesk\Maya2016\bin\python27.zip\ctypes\__init__.py line 365: 126 #
- Download the Redistributable C++ library in your language directly from microsoft website here.
2) When I load the plugin I get a License not present error.
If you get the following error your license file hasn’t been created.
// Hard Mesh: License not present //
// Hard Mesh: Invalid License or Trial licence is expired //
// Hard Mesh: Contact: info@pux-3d.com for information
- Check that you have a file “.lic” under your maya user prefs.
- If not, try to activate the license as explained in the licensing instructions.